Building a Trivia Bot for Facebook Messenger With Laravel (Part 1)
Bots are becoming popular as a novel way of delivering rich experiences to users in apps they are already familiar with. And Laravel has become one of the most popular PHP frameworks over the past few years, because of its power, simplicity and clean syntax, to mention a few.
In this five-part series marrying the two technologies, we’ll be building a bot for Facebook Messenger using Laravel. We’ll build a bot that tests the user on general knowledge trivia. Basically, our bot will deliver a new trivia question in response to the keywords “new” and “next”, and will tell us if our answers are correct or not.
In this first part, we’ll just set up the bot and deploy. I’ll be hosting mine on Heroku, but you can use anything that works for you. In subsequent parts, we’ll finish the bot’s functionality and then improve it by leveraging Messenger Platform features such as structured messages and the Get Started button. Alright, let’s go! 🚀
Step 1: Setting up the site
- Create a new Laravel project. I’ll call mine botrivia (corny, I know 🙈).
laravel new botrivia

#or use
composer create-project --prefer-dist laravel/laravel botrivia
To ensure Heroku deploy works, create a new file in the root directory of your project and name it Procfile, with the following contents:
web: vendor/bin/heroku-php-apache2 public/
This tells Heroku where to find your project public folder.
- Create a new app on http://dashboard.heroku.com. Your app’s url is now https://<yourappname>.herokuapp.com.
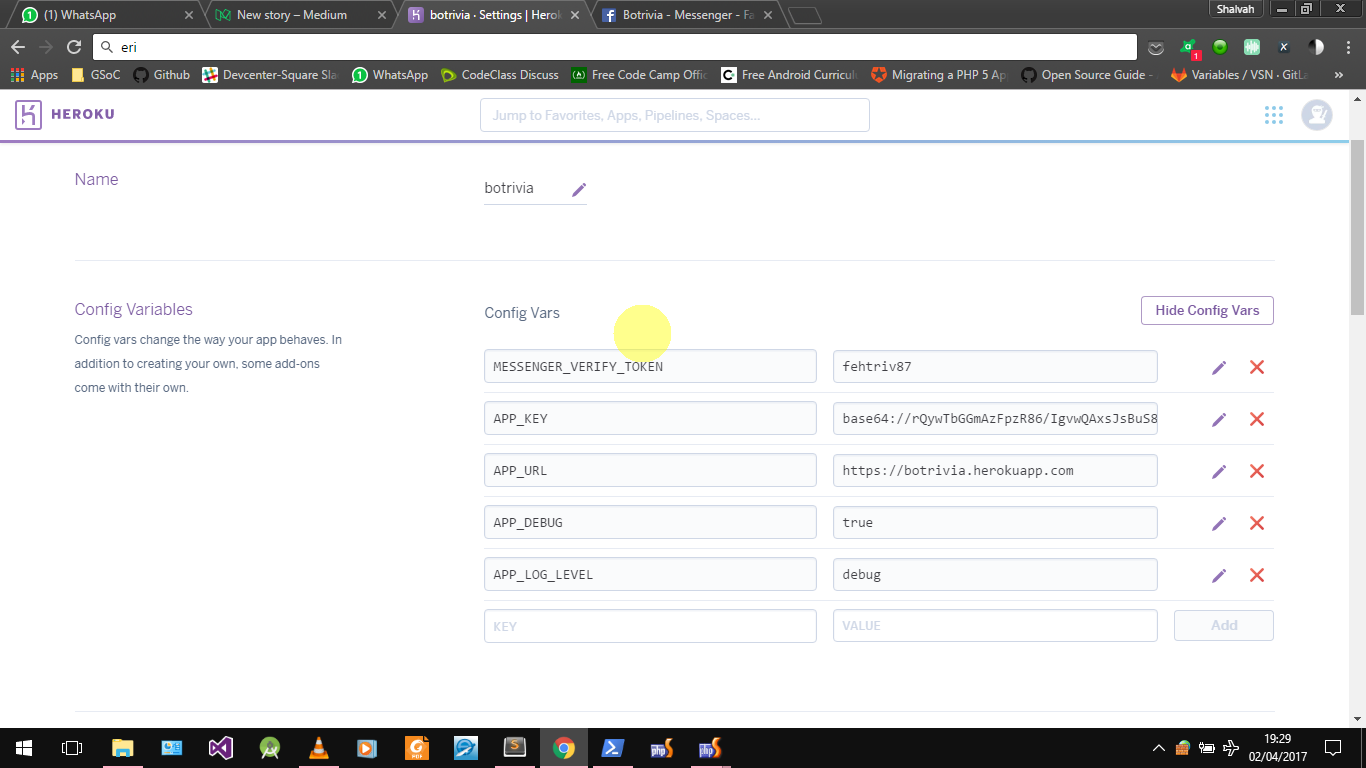
In your app settings, click on Add Config Var, then add a new var called MESSENGER_VERIFY_TOKEN. Give it any random string value (something like ef3h56pr), and take note of it. Also add an APP_KEY (copy its value from your local .env file) and APP_URL (set to your app’s heroku url). You might also want to set APP_DEBUG=true and APP_LOG_LEVEL=debug to help you debug easily. (You’ll need to set the log handler in your app’s config to errorlog, though.)
Note: all these are to be set on Heroku. In this tutorial, we’ll be testing on live directly, so it doesn’t really matter if they’e set on your local .env
Now we’ll do a test push to Heroku. First, we add a git remote called heroku:
git remote add heroku https://git.heroku.com/<yourappname>.git
Then commit changes and push
git add .
git commit -m "Enter a commit message"
git push heroku master
If you see “verifying deploy…done” at the bottom of the long response, you’re good to go. Go to https://dashboard.heroku.com/apps/<yourappname>/resources and ensure the web dyno is switched on. Then visit your app at its url. You should see the default Laravel welcome page.
Step 2: Adding Verification Logic
Now, we’ll add the code that allows Facebook to verify that the URL we’re using is ours. For verification, Facebook makes a GET request to whatever URL we provide in the form http://your-webhook-url?hub.mode=subscribe&hub.challenge=<some-code>&hub.verify_token=<your-verify-token>. We need to handle this.
We’ll use a middleware that checks incoming requests and responds with the verification code if the request is of the type subscribe and contains our MESSENGER_VERIFY_TOKEN. If it is, we respond with the hub.challenge parameter sent in the request. Otherwise, we pass it on. Create the middleware using php artisan make:middleware VerifyMiddleware
In the generated file, app/Http/Middleware/VerifyMiddleware.php, add the following code:
public function handle($request, Closure $next)
{
    if ($request->input("hub_mode") === "subscribe"
        && $request->input("hub_verify_token") === env("MESSENGER_VERIFY_TOKEN")) {
        return response($request->input("hub_challenge"), 200);
    }
    return $next($request);
}
Note: the query parameters Facebook sends are actually prefixed with hub. , but we use hub_ because PHP automatically converts full stops in query parameters to underscores.
Register the middleware in the $routeMiddleware array in app/Kernel.php:
"verify" => \App\Http\Middleware\VerifyMiddleware::class
Add the route for the webhook we’ll use in routes/web.php
//route for verification
Route::get("/trivia", "MainController@receive")->middleware("verify");

//where Facebook sends messages to. No need to attach the middleware to this because the verification is via GET
Route::post("/trivia", "MainController@receive");
To prevent errors, create the controller(php artisan make:controller MainController) and place an empty method receive in it. Then git add, commit and push your changes.
We’ll also need to remove the CSRF protection Laravel puts on requests,by commenting out this line in the $middlewareGroups[“web"] array of `app/Http/Kernel.php``
// \App\Http\Middleware\VerifyCsrfToken::class,

//so we don’t get TokenMismatchError on every request
Done with Step 2. Now let’s put this into action.
Step 3: Setting up on Facebook
-
Create a Facebook Page at http://facebook.com/pages/create (or use an existing one). Choose a category**.** You can leave other fields blank.
-
Create a Facebook App by visiting http://developers.facebook.com/apps. Choose a display name and category.
-
You should be automatically redirected to the App Dashboard. Click Add Product on the sidebar and click Get Started in the Messenger section. Then select Setup Webhook, enter https://yourappname.herokuapp.com/trivia as the URL, select subscriptions
messagesandmessaging_postbacks. Then click Verify and Save. Great! We’re in! -
Next, subscribe your App to the Page you created by selecting it in the Webhooks section
-
Lastly, in the Token Generators section, select your page and copy the generated token. Add it to your config vars as PAGE_ACCESS_TOKEN. It’ll come in handy later.
All done…almost.
Step 4: Testing our bot
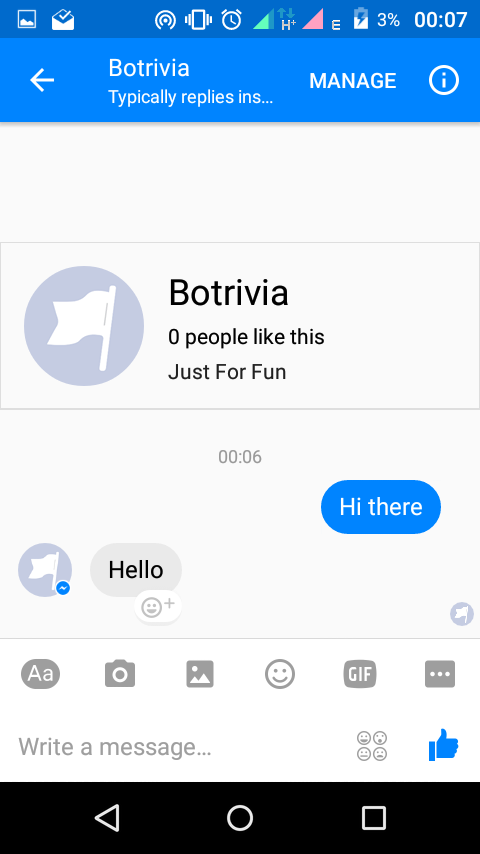
Just to be sure the bot works, we’ll modify our code so the bot responds “Hello” whenever a user messages it. Add the following in your controller receive method
public function receive(Request $request)
{
        $data = $request->all();
        //get the user’s id
        $id = $data["entry"][0]["messaging"][0]["sender"]["id"];
     $this->sendTextMessage($id, "Hello");
}
We’ll go into more detail about parsing the request and extracting data from it in Part 2. Create a sendTextMessage method. First, we define our message content, based on the message structure described here. Then we use curl to call the Messenger Send API with our message. We’ll look at these in more depth in later parts.
private function sendTextMessage($recipientId, $messageText)
    {
        $messageData = [
            "recipient" => [
                "id" => $recipientId
            ],
            "message" => [
                "text" => $messageText
            ]
        ];
        $ch = curl_init('https://graph.facebook.com/v2.6/me/messages?access_token=' . env("PAGE_ACCESS_TOKEN"));
        curl_setopt($ch, CURLOPT_RETURNTRANSFER, true);
        curl_setopt($ch, CURLOPT_HEADER, false);
        curl_setopt($ch, CURLOPT_HTTPHEADER, ["Content-Type: application/json"]);
        curl_setopt($ch, CURLOPT_POST, true);
        curl_setopt($ch, CURLOPT_POSTFIELDS, json_encode($messageData));
        curl_exec($ch);

}
That’s it. Test it out by messaging your page. You should receive “Hello” in response.
 Yeah!
Yeah!
Thanks for following. More awesome stuff coming up!in Part 2! 💪
Github repo for the bot is here.
If you liked this article, please recommend and share. And if you spot any needed improvement, just suggest it in the comments. I’d appreciate it. Thanks!
Next: Implementing basic functionality for our bot.
Building a Trivia Bot for Facebook Messenger with Laravel (Part 2)
Part 3: Adding Messenger-specific features
Building a Trivia Bot for Facebook Messenger with Laravel (Part 3)
Part 4: Modifying our bot’s Messenger Profile
Building a Trivia Bot for Facebook Messenger with Laravel (Part 4)
Part 5: Personalising the user experience
Useful links:
Getting Started - Messenger Platform - Documentation - Facebook for Developers
Webhook Reference - Messenger Platform - Documentation - Facebook for Developers
I write about my software engineering thoughts and experiments. Want to follow me? I don't have a newsletter; instead, I built Tentacle: tntcl.app/blog.shalvah.me.
