Building a Trivia Bot for Facebook Messenger with Laravel (Part 5)
Howdy! So we’ve been building a simple trivia bot that runs on Facebook Messenger. We set up the basic structure of the bot, then we added its core functionality, and then we used some Messenger Platform tools (like Message Buttons and Quick Replies) to make the bot simpler to use, and more recently, we added a Get Started button, greeting text and persistent menu to our bot to help the user become familiar with the bot easily. We did those using the Messenger Profile API.
In this final part, we’ll make use of another Facebook/Messenger API, theUser Profile API. While the Messenger Profile API allowed us to set information about our bot, the User Profile API allows us to get information about the user, information that we can then use to personalize the user’s experience.
These are the data available to us in this API:
- First name
- Last name
- Gender
- Locale
- Timezone
- Profile picture URL
- If payment is enabled on Messenger for the user
- Details of the last Messenger Conversation Ad user was referred from
To access the API, we need to do two things:
-
Get the user ID (this is actually a Page-Scoped User ID, which means that it’s only valid for the particular page the user is messaging)
-
Make a GET request to https://graph.facebook.com/v2.6/<USER_ID>?access_token=PAGE_ACCESS_TOKEN.
To use this API, though, the user must have tapped your “Get Started” button or sent your bot a message. Since we already have a “Get Started” button in place as the only entry point to our bot, we don’t have anything to worry about.
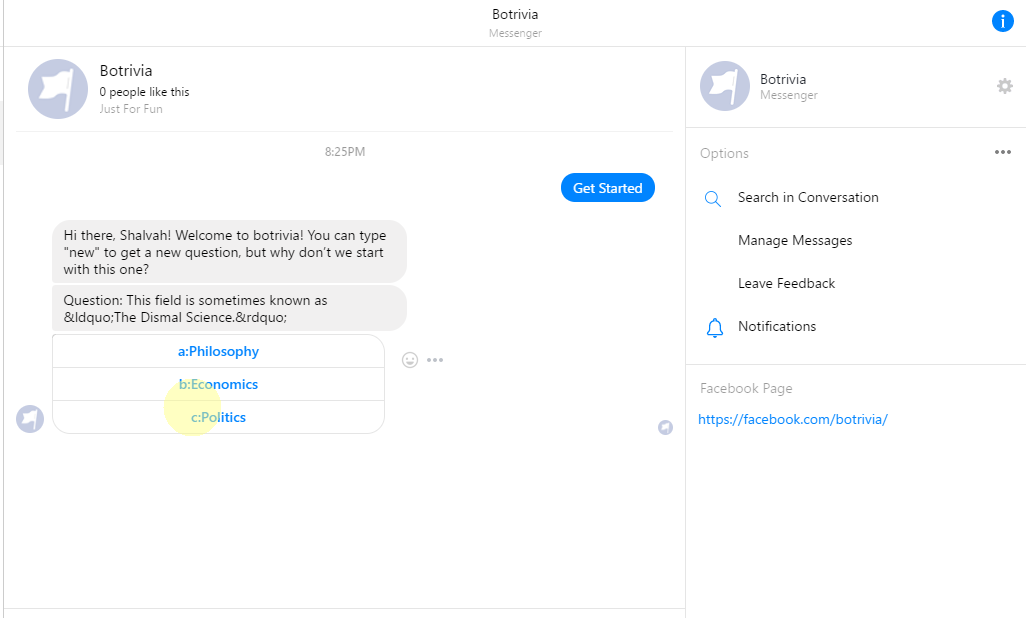
For our bot, we’ll update the code so it addresses the user by name (something like “Hello, Shalvah!”) after he/she taps the “Get Started” button. Let’s get started!
At this point, if you’ve been following, your App\Jobs\BotHandler.php should have a method that looks like this:
public function handle()
{
    $bot = new Bot($this->messaging);
    $custom = $bot->extractData();

    //a request for a new question
    if ($custom["type"] == Trivia::$NEW_QUESTION) {
        $bot->reply(Trivia::getNew());
    } else if ($custom["type"] == Trivia::$ANSWER) {
        if (Cache::has("solution")) {
            $bot->reply(Trivia::checkAnswer($custom["data"]["answer"]));
        } else {
            $bot->reply("Looks like that question has already been answered. Try \"new\" for a new question");
        }
    } else if ($custom["type"] == "get-started") {
        $bot->reply("Hi there! Welcome to botrivia! You can type \"new\" to get a new question, but why don’t we start with this one?");
        $bot->reply(Trivia::getNew());
    } else {
        $bot->reply("I don't understand. Try \"new\" for a new question");
    }
}
We’ll replace reply() in the line in bold with a new method, sendWelcomeMessage() :
- } else {
-       $bot->reply("I don't understand. Try \"new\" for a new question");
+ }  else if ($custom["type"] == "get-started") {
+       $bot->rsendWelcomeMessage();
+       $bot->reply(Trivia::getNew());
+ }
Now we define the sendWelcomeMessage() in our
public function sendWelcomeMessage()
{
    $name = $this->getUserDetails()["first_name"];
    $this->reply("Hi there, $name! Welcome to botrivia! You can type \"new\" to get a new question, but why don’t we start with this one?");
}
So our sendWelcomeMessage() method makes a call to the user API via getUserDetails()), then retrieves the user’s first name from there and sends a reply where the user is called by name. Very straightforward, yeah?
Now let’s define the getUserDetails() method. This is where the real work of interacting with the API is done.
As it turns out, there isn’t much work to do! Remember, it’s just two things: get the user’s id, and make the API call with it. As it turns out, we can easily get the user ID via the Messaging`` object’s getSenderId()` method we defined in Part 2. And then we use curl to send the GET request, and that’s all:
private function getUserDetails()
{
    $id = $this->messaging->getSenderId();
    $ch = curl_init("https://graph.facebook.com/v2.6/$id?access_token=" . env("PAGE_ACCESS_TOKEN"));
    curl_setopt($ch, CURLOPT_RETURNTRANSFER, true);
    curl_setopt($ch, CURLOPT_HEADER, false);
    curl_setopt($ch, CURLOPT_HTTPHEADER, ["Content-Type: application/json"]);

    return json_decode(curl_exec($ch), true);
}
And now, if we deploy our code and test out the bot by pressing “Get Started”, it works! It addresses me by name! 💃💃
With the information from the User Profile API, we can go on to do more powerful things, such as tailoring the bot’s behaviour/language to match different genders or locales,. For instance, if your bot is for a clinic service, and the user profile API tells you your user is a male, you know there’s no point advertising ante-natal services to him.
So our bot is ready to use!! All that’s left is for us to publish our bot, so other people can access it. Simply follow the instructions here, and you’re good to go. Woo-hoo!! 🚀🚀
Thanks for following through the series! Hope I didn’t bore you out.
You can check out the GitHub repo for the bot here.
As always, I’d appreciate your feedback. Let me know in the comments how you’ve been getting on thus far and how I can make the articles better. Thanks!
Useful Links:
User Profile API - Messenger Platform - Documentation - Facebook for Developers
Launching Your Bot - Messenger Platform - Documentation - Facebook for Developers
Click❤ below to recommend this to other Medium readers interested in AI, chatbots and development.
I write about my software engineering thoughts and experiments. Want to follow me? I don't have a newsletter; instead, I built Tentacle: tntcl.app/blog.shalvah.me.
