Building a Trivia Bot for Facebook Messenger with Laravel (Part 3)
Hi there! Still on our trivia Messenger bot. If you’re just joining in, why not catch up with our setup and how we implemented the bot’s basic functionality first?
Up till now, what we’ve done is build a generic web app that communicates with users via webhooks containing text. While this is technically still a bot, it is important to realise that a bot is actually a means of providing content or functionality (up to the level of a full app) to the user via a channel that they are already familiar with (in this case, Messenger). That’s why Facebook provides a number of special features that make the experience smoother for the user. Today, we’ll be updating our bot to make use of some of tose features.
- We’ll use Buttons for the answer options, so the user can easily tap on his answer.
- We’ll use Quick Replies to get the user to ask for a new question.
Modelling Data (once again)
Remember the Messaging object we created in Part 2? It models a messaging JSON object Facebook sends us, and it can be of different types (for now, only message and postbacktypes, because those were the only two events we subscribed to in Part 1.) We already have our Message class, so let’s create the Postback class, based on the description in the docs:
Create the file app\Bot\Webhook\Postback.phpwith the following content:
namespace App\Bot\Webhook;

class Postback
{
    private $payload;
    private $referral;
    public function __construct(array $data)
    {
        $this->payload = $data["payload"];
        $this->referral = isset($data["referral"]) ? $data["referral"] : [];
    }
    public function getPayload()
    {
        return $this->payload;
    }
    public function getReferral()
    {
        return $this->referral;
    }
}
All we’ve done here is mapping Facebook’s data to a PHP object, with adequate getters for the fields.
Next, update the constructor of your Messaging class so it now looks like this:
public function __construct(array $data)
{
    $this->senderId = $data["sender"]["id"];
    $this->recipientId = $data["recipient"]["id"];
    $this->timestamp = $data["timestamp"];
    if(isset($data["message"])) {
        $this->type = "message";
        $this->message = new Message($data["message"]);
    } else if (isset($data["postback"])) {
        $this->type = "postback";
        $this->postback = new Postback($data["postback"]);
    }
}
Of course, don’t forget to add the field private $postbackto the class definition, along with its getter method:
public function getPostback()
{
    return $this->postback;
}
Handling the Postback event
Next, update the handle() method of your BotHandlerto look like this:
public function handle()
{
    $bot = new Bot($this->messaging);
    $custom = $bot->extractData();

    //a request for a new question
    if ($custom["type"] == Trivia::$NEW_QUESTION) {
        $bot->reply(Trivia::getNew());
    } else if ($custom["type"] == Trivia::$ANSWER) {
        if (Cache::has("solution")) {
            $bot->reply(Trivia::checkAnswer($custom["data"]["answer"]));
        } else {
            $bot->reply("Looks like that question has already been answered. Try \"new\" for a new question");
        }
    } else {
        $bot->reply("I don't understand. Try \"new\" for a new question");
    }
}
I’d like to point out a few things.
- A little logic update. If the user sends a question answer when the last question has already been answered i.e.there is no
solutionin the cache), wee remind them that the question has been answered. - You’ll note we replaced the
extractDataFromMessage()method withextractData(). This is a function that internally determines the type(Message or Postback) of Messaging item received, and handles it appropriately, returning data in the expected array format. This is good because it helps us keep our code DRY and we don’t need to worry about “type checks”. We’ve moved that responsibility fto the Bot class. Let’s implement that now:
public function extractData()
    {
        $type = $this->messaging->getType();
        if($type == "message") {
            return $this->extractDataFromMessage();
        } else if ($type == "postback") {
            return $this->extractDataFromPostback();
        }
        return [];
    }
Aha. Much cleaner now.
Now all we need to do is to implement the extractDataFromPostback()) method. If you go through the docs for a few minutes, you’d realize that what we need to do is actually quite simple, because of the way we built our app earlier. Let’s take a look at the anatomy of a postback. It contains two items, “payload” and “referral”. The payload is the data that the button that was clicked holds. In this case, this means that we’ll set each button’s payload to be its option (a, b, c, or d). So when the user clicks on the button that holds option A, “a” gets sent back to us.
Let’s implement the method. Since we’re only using postbacks for one kind of button (answer choices), we can assume any postback we get has to be an answer, so no need to validate its contents with regex.
public function extractDataFromPostback()
    {
        $payload = $this->messaging->getPostback()->getPayload();
return [
            "type" => Trivia::$ANSWER,
            "data" => [
                "answer" => $payload
            ]
        ];
    }
The last thing left for us to do is to prepare the format of the message we send when the user requests a new question. This is where we create the buttons and set their payload values. We modify the toMessage() method of the Trivia class to look like this:
public function toMessage()
{
    //compose message
    $text = htmlspecialchars_decode("Question: $this->question", ENT_QUOTES | ENT_HTML5);

    $response = [
        "attachment" => [
            "type" => "template",
            "payload" => [
                "template_type" => "button",
                "text" => $text,
                "buttons" => []
            ]
        ]
    ];

    $letters = ["a", "b", "c", "d"];
    foreach ($this->options as $i => $option) {
        $response["attachment"]["payload"]["buttons"][] = [
            "type" => "postback",
            "title" => "{$letters[$i]}:" . htmlspecialchars_decode($option, ENT_QUOTES | ENT_HTML5),
            "payload" => "{$letters[$i]}"
        ];
        if($this->solution == $option) {
            Cache::forever("solution", $letters[$i]);
        }
    }

    return $response;
}
We pass the data we get from the API through the htmlspecialchars_decode() function so as to convert escaped characters like " to their real form ( ').
And then, one little detail: Facebook allows a maximum of three buttons in a message, so we’ll remove one of the wrong answers when creating a new trivia question:
public function __construct(array $data)
{
    $this->question = $data["question"];
    $answer = $data["correct_answer"];
    //pick only two incorrect answers
    $this->options = array_slice($data["incorrect_answers"], 0, 2);
    $this->options[] = $answer;
    shuffle($this->options);
    $this->solution = $answer;
}
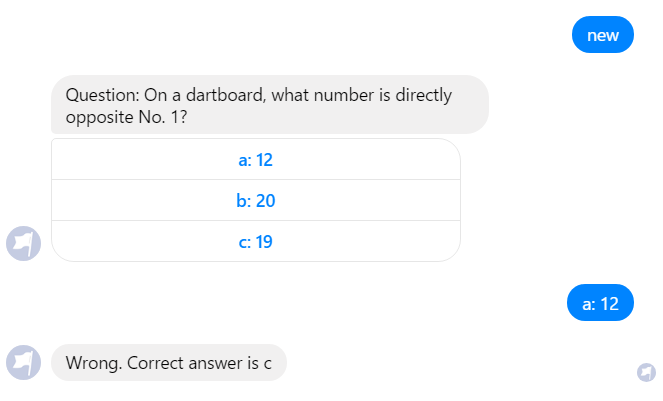
And we’re done with the postback implementation. After deploying your code, you should be able to get something like this:

You can see now that we no longer need to type an answer option (though that still works). We can just simply tap the option we choose, and it works!
Handling a Quick Reply
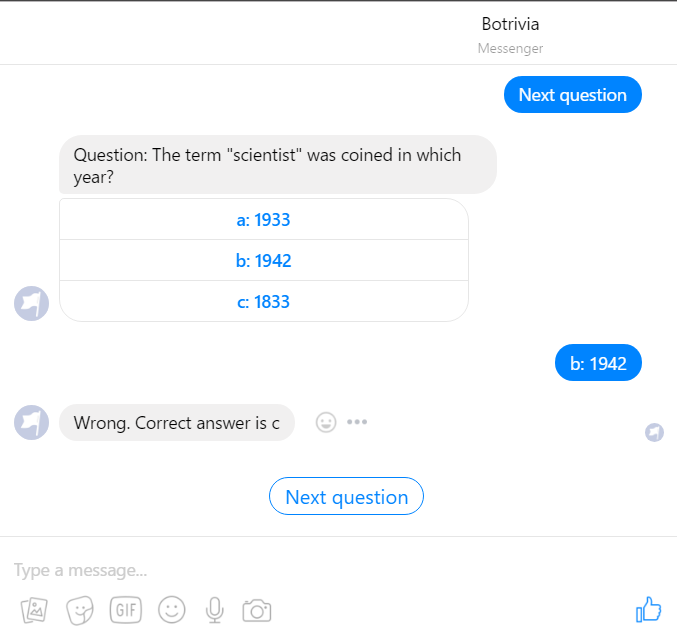
Quick replies are like a middle ground between buttons and messages. They’re text (with an optional image) messages, but you can define payloads for them. We’ll add a quick reply that says “Next question” to our “checkAnswer” messages, so the user can just tap on it to get a new question. But first let’s get ready to handle it.
We don’t need to do any extra data modelling here, because our Message class already has a getQuickReply() method that gives us the quick_reply object, if any. As per Facebook docs, this is an array containing two elements, title which is the actual test written on the Quick Reply, and payload which is the hidden value we set the Quick Reply to hold.
To handle a quick reply, we only need to change this line of code in our extractDataFromMessage():
$text = $this->messaging->getMessage()->getText();
with these:
$qr = $this->messaging->getMessage()->getQuickReply();
if (!empty($qr)) {
    $text = $qr["payload"];
} else {
    $text = $this->messaging->getMessage()->getText();
}
This just checks if the user sent a quick reply. If they did, we get the value of the payload and work with that. If there isn’t a quick reply, we fallback to our regular text messages. That’s all.
Sending the Quick Reply
We are adding the quick reply to “answer-check” messages only (ie “Wrong answer” or “Correct answer”). This means we’ll need to change the format of the data that the static method Trivia::checkAnswer() reuturns, from a plain string to an array in the prepared Messenger message format, in line with the description found here.
public static function checkAnswer($answer)
{
    $solution = Cache::get("solution");
    if ($solution == strtolower($answer)) {
        $response = "Correct!";
    } else {
        $response = "Wrong. Correct answer is $solution";
    }
    //clear solution
    Cache::forget("solution");
    return [
        "text" => $response,
        "quick_replies" => [
            [
                "content_type" => "text",
                "title" => "Next question",
                "payload" => "new"
            ]
        ]
    ];
}
And with that, we deploy our code…and voila!

Thanks for following. In Part 4, we’ll look at how we can onboard a user using something called Messenger Profile. Follow me to stay in the loop!
You can check out the github repo for the bot here.
As always, I’d appreciate your feedback. Let me know how you’ve been getting on thus far and how I can make the articles better. God bless!
Next: Modifying our bot’s Messenger Profile
Part 5: Personalising the experience
Useful Links:
Postback - Messenger Platform - Documentation - Facebook for Developers
Quick Replies - Messenger Platform - Documentation - Facebook for Developers
Send API Reference - Messenger Platform - Documentation - Facebook for Developers
I write about my software engineering thoughts and experiments. Want to follow me? I don't have a newsletter; instead, I built Tentacle: tntcl.app/blog.shalvah.me.